Trendy Enthusiast

How to Iron a Dress Shirt: The Correct Order and Technique

The correct order to iron a dress shirt is: collar first, then cuffs and sleeves, then the back, followed by the side panels, and the front last. Start with the iron set to the temperature appropriate for the fabric. Work section by section, never dragging the iron across seams or buttons. A shirt ironed in the correct sequence takes under ten minutes and holds its line all day.

Get the order wrong and you undo your own work i.e pressing a section you’ve already finished by moving awkwardly around the board to reach another. This guide covers the complete sequence, the correct technique for each section, and the temperature settings that separate a sharp shirt from a scorched one.

This is what every well-dressed man should know by thirty.

Why the Order Matters

Ironing a dress shirt is not simply a question of applying heat to fabric. It’s a sequencing problem.

The reason most home-ironed shirts still look substandard is not the iron, the water, or even the technique – it’s the order. Men typically start wherever the shirt lands on the board: front panel, then back, then sleeves, then collar last. By the time the collar is done, the front has already acquired new creases from being draped awkwardly across the board during the other sections.

The correct sequence works from the smallest, most structurally complex parts outward to the largest flat panels. Small sections hold their press without being re-crumpled. Large panels are done last, when there’s less awkward repositioning required. The shirt comes off the board ready to wear.

There is also a practical reason to start with the collar and cuffs: these are the sections most visible when the jacket is on. A man in a blazer shows his collar and his cuffs. Everything else is secondary. Start where it matters most.

Before You Begin: Set Up Correctly

The quality of the result is determined before the iron touches the shirt.

Iron temperature

Set it correctly for the fabric before you start. Applying too much heat to a synthetic or fine cotton blend causes irreversible shine and, at extreme settings, scorches the fabric entirely. A good steam iron’s settings are not just guidelines for delicate fabrics, they are limits.

FabricIron SettingSteam
LinenHigh (210°C)Yes - heavy steam
100% CottonHigh (200°C)Yes
Cotton blendMedium-high (180°C)Yes
Polyester blendMedium (150°C)Light or none
SilkLow (110°C)No - use a damp cloth
Wool/flannelMedium with clothYes - through pressing cloth

When in doubt, test on the shirt tail first – it’s hidden when tucked, and any mishap there is invisible.

Water in the iron

Use distilled or filtered water in the steam reservoir. Tap water deposits minerals inside the iron over time, which eventually spit out as brown flecks onto white fabric. If you’ve ever found mysterious brown dots on a freshly ironed shirt, this is why.

Shirt dampness

Iron a slightly damp shirt, not a bone-dry one. If your shirt is fully dry from the wash, use the steam function or a spray bottle to introduce light moisture before ironing. Steam relaxes the fibres and makes creases significantly easier to remove. A completely dry shirt requires more pressure and more passes both of which increase the risk of shine and damage.

Board height

Set the ironing board at a height where your ironing arm is roughly parallel to the board surface. Too low and you’re hunching; too high and you lose control. This sounds minor. After ironing six shirts it stops feeling minor.

The Correct Order: Section by Section

Step 1 - The Collar

Always the first section. The collar is the most structured part of the shirt and requires the most care.

Open the collar flat. Start with the underside – the side that sits against your neck. Iron from the collar points inward toward the centre, not from the centre outward. Ironing toward the points risks pushing a small ridge of fabric over the tip, creating a crease that cannot be removed without re-ironing entirely.

Flip the collar and repeat on the outer (visible) side, again working from points inward.

If the shirt has a fused collar (which most modern dress shirts do), the collar should lie flat and crisp after one careful pass. If it has a soft, unfused collar, it will require a slightly longer pass and more steam to hold its shape.

Do not fold the collar down after ironing it. Leave it open and flat until the shirt is fully pressed. Folding it down while the rest of the shirt is still being ironed simply re-creases the section you just finished.

Step 2 - The Cuffs

Unbutton the cuffs completely, both the main button and the gauntlet button (the small button further up the placket, if present). Open the cuff flat.

Iron the inside of the cuff first, then the outside. Work from the edges toward the centre; avoid ironing directly over buttons, which can crack under sustained heat and pressure. The iron should glide to within a few millimetres of each button, not across it.

Pay attention to the cuff placket – the small folded band that houses the gauntlet button. Keep it flat and iron it carefully; it’s visible at the wrist when a jacket sleeve rides up, which it will.

Step 3 - The Sleeves

The sleeves are where the majority of ironing attempts go wrong. The goal is a single, clean crease running along the top of the sleeve from shoulder to cuff – not two creases, not a rounded pressed look, and not a crease running along the bottom edge.

Lay the sleeve flat on the board, aligning the seams directly on top of each other. Smooth the fabric with your free hand before the iron touches it. Iron the top half of the sleeve facing upward, then flip and do the underside.

The crease should land on the top edge of the sleeve, running from the shoulder seam point to the cuff. This is the sharp, tailored crease. It is the visual signal of a properly ironed shirt.

Repeat for the other sleeve. Take the same care – asymmetric sleeves are visible when the jacket is removed.

On sleeve heads: The rounded section at the top of the sleeve where it meets the shoulder seam is best pressed on a sleeve board or over the narrow end of the ironing board. Pressing it flat on the main board creates an unwanted crease across the sleeve head. If you only have a standard board, use the narrow tip and work around the curve carefully.

Step 4 - The Back

Slide the shirt onto the board so the yoke (the panel that runs across the upper back and connects the two shoulders) sits over the wide end of the board. Iron the yoke first, then work downward across the back panel in smooth, overlapping passes.

Move the shirt along the board as needed to cover the full width of the back without having to stretch or twist the fabric. Ironing stretched fabric creates distortion that is visible when the shirt is worn.

Take care around the centre back pleat if the shirt has one. Press it flat in the direction it naturally folds – do not try to reverse it.

Step 5 - The Front Panels

The front panels are done last, for a simple reason: they will lie flat on the board without being disturbed by any subsequent repositioning.

Start with the button placket – the strip that houses the buttons on the right front panel. Work the iron tip between each button, pressing the fabric flat without crossing the buttons themselves. This is detail work. It takes an extra sixty seconds and is immediately visible in the finished result.

Then press the full right front panel, working from the placket outward toward the side seam.

Repeat for the left front panel (the buttonhole side), pressing around the buttonholes rather than over them.

The shirt is now fully ironed. Hang it immediately on a hanger – do not fold it or leave it on the board. The heat retained in the fabric after ironing helps it set in its pressed shape. Folding it warm introduces new creases; hanging it allows everything to cool correctly.

Common Ironing Mistakes and How to Avoid Them

Ironing in the wrong direction around buttons: Ironing over buttons at high temperature can crack or melt them – particularly the resin buttons used on most dress shirts. Always iron to within a few millimetres of each button, using the iron’s tip for precision.

Using too much pressure on synthetic blends: Polyester and poly-cotton shirts develop a permanent shiny patch when ironed with high heat and heavy pressure. Use medium heat, light steam, and a pressing cloth if necessary.

Ironing a completely dry shirt: This requires significantly more passes and higher temperature to remove creases. The result is increased risk of shine and fibre damage. Lightly mist the shirt or use the iron’s steam function throughout.

Dragging the iron across seams: Raised seams can create drag marks. Lift and reposition rather than dragging over a seam under pressure.

Leaving the shirt on the board: Hanging the shirt immediately after ironing, while it’s still warm, sets the press. Leaving it on the board while it cools tends to create new creases at fold points.

If you are without an iron entirely – travelling, staying elsewhere, or dealing with a last-minute situation – the practical methods in No Iron? No Stress: Get a Wrinkle-Free Shirt Instantly cover every reliable alternative, including the bathroom steam method that works in under fifteen minutes.

The Shirt Is Pressed. Now Build the Outfit.

A correctly ironed dress shirt is the foundation – not the finished result. The next question is what to wear with it, and for which occasion.

A white Oxford-cloth dress shirt pressed to this standard can carry a charcoal suit to a boardroom, a navy blazer and chinos to a smart dinner, or stand alone with tailored trousers at a Friday meeting. The occasion determines what surrounds it.

If you’re not certain what a specific dress code calls for or how to build an outfit around a freshly pressed shirt for a particular event, the Dress Code Decoder handles that directly. Enter the occasion and formality level; it outputs a complete outfit with a formality rating. Your ironed shirt is already the strongest piece in the room.

How to Keep a Shirt Sharp Longer

Ironing a shirt correctly is one half of the equation. The other half is not having to iron it again before it’s been worn twice.

Hang immediately after washing. The centrifuge spin of a washing machine creates deep-set creases that are significantly harder to remove than those from natural draping. Remove dress shirts from the machine promptly and hang them while damp. Many creases will fall out entirely without ironing.

Use a lower spin speed for dress shirts and fine cotton most modern machines have a dedicated delicate or shirt cycle. The lower the RPM on the spin, the fewer the creases.

Hang on a proper hanger. Thin wire hangers distort the shoulder shape of a shirt over time. Use a wooden or plastic contoured hanger that supports the shoulder seam properly.

Steam between wears. A handheld garment steamer used for sixty seconds before dressing can refresh a lightly worn shirt without a full re-iron. It is also significantly faster. For men who travel frequently or need a shirt ready at short notice, a travel steamer is one of the most practical wardrobe investments available. According to the Textile Services Association, steaming is gentler on cotton fibres than dry ironing and extends garment life over repeated cycles.

Know when to iron versus when to steam. Steaming removes light creases and refreshes fabric. Ironing with a flat iron on a board sets a sharp crease and provides structure. For collars and cuffs, iron. For the body of a lightly worn shirt, steam is usually sufficient.

If you are travelling and need the shirt pressed on arrival, the techniques in How to Fold a Suit for Travel include the bathroom steam method that works on shirts as well as suit jackets.

Dress Shirts Worth Ironing

Not all dress shirts iron equally, and the quality of the fabric determines both how easy the shirt is to press and how long it holds its shape.

100% cotton broadcloth: The benchmark. Takes a crisp press, holds it well, breathes properly. The most rewarding fabric to iron correctly.

Oxford cloth (OCBD): Slightly heavier weave, more casual than broadcloth, excellent durability. Irons well; slightly less crisp than broadcloth due to the basket weave.

Poplin: Fine, lightweight weave. Takes a sharp press and looks very clean. Can show sweat and crease more readily than Oxford cloth.

Twill: Diagonal weave that resists creasing more than broadcloth. Slightly easier to keep looking pressed between irons.

Linen: Requires the highest heat setting and heavy steam. Linen will crease again within hours of wearing – this is expected and part of its character. Press it well at the start of the day and accept that a linen shirt looks lived-in by the evening. That is not a flaw.

Polyester blends: Iron at lower temperatures, accept that the result will always look slightly less crisp than pure cotton. These shirts are chosen for convenience, not sharpness. If sharpness matters, invest in cotton.

For a thorough reference on dress shirt fabrics and their properties, the British Textile Technology Group publishes fabric care guides that are worth bookmarking if you’re building a wardrobe around quality pieces.

Frequently Asked Questions

The correct order is: collar first, then cuffs and sleeves, then the back panel, then the front panels last.

Temperature depends on fabric. 100% cotton and linen can be ironed at high heat (190-210 degrees Celsius) with steam. Polyester and synthetic blends require medium heat (150 degrees) with little or no steam.

Neither completely wet nor completely dry. The optimum state is slightly damp.

Iron from the collar points inward toward the centre, never from the centre outward.

A 100% cotton dress shirt ironed correctly and hung immediately will hold its press through a full day of wear in a temperate climate.

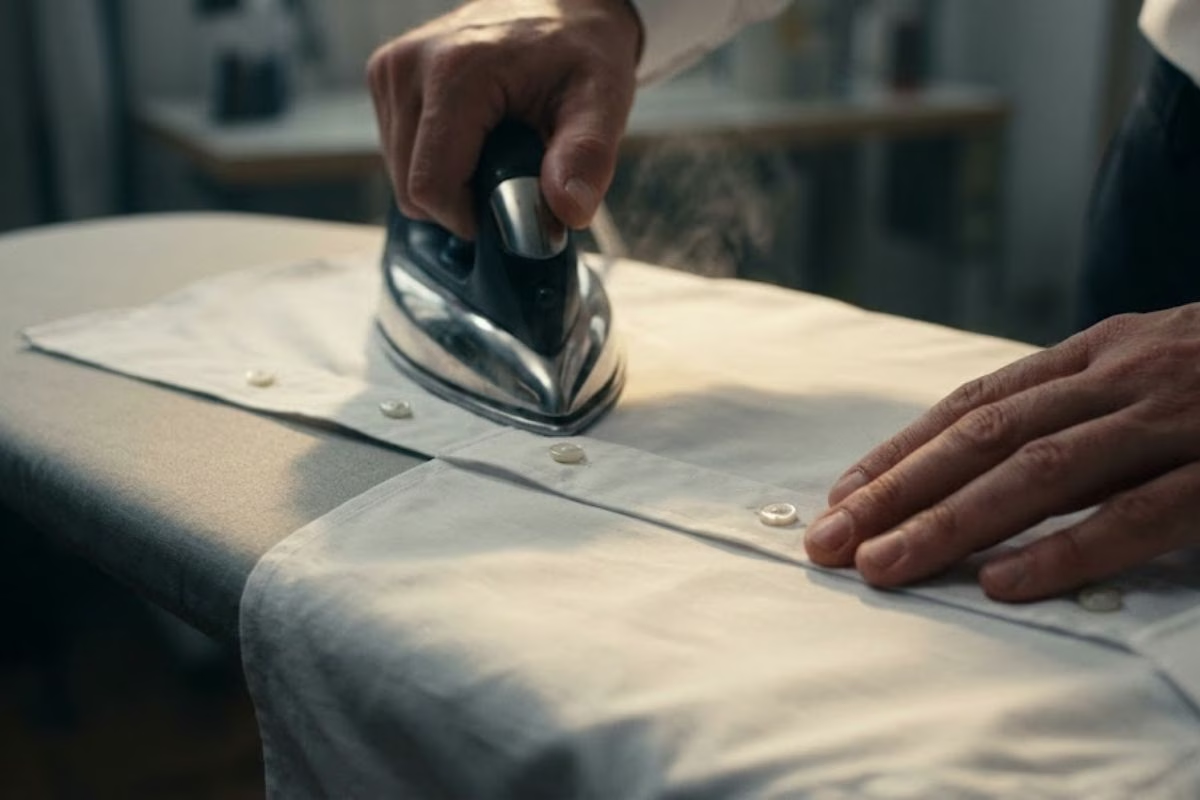
Yes, but at a lower temperature than you would use on standard cotton. Non-iron shirts are chemically treated to resist creasing, and that treatment degrades under high direct heat. Set the iron to medium – no higher than 150°C – and use a pressing cloth between the iron plate and the shirt surface. Minimal or no steam. The lower heat is sufficient because non-iron fabric resists creasing by design; you are only addressing residual creases, not pressing a fully wrinkled shirt. A garment steamer is a gentler and often more effective alternative for non-iron shirts. For the full breakdown of how non-iron shirts work and how to care for them correctly, read the Easy-Iron vs Non-Iron guide.

A non-iron shirt is a cotton dress shirt that has been specially treated during manufacturing with a wrinkle-resistant finish. This treatment is absorbed into the fabric so the shirt can be washed, dried, and worn with little to no ironing because it resists creasing during normal use. It works best when washed at 30–40°C, taken out of the machine quickly, and hung to dry right away. Non-iron shirts are not completely crease-proof forever, as the treatment gradually weakens after about 30–50 washes, but during that time they greatly reduce or almost eliminate the need for ironing.

An ironed shirt is not a luxury. It is a baseline. The man who understands his clothes well enough to maintain them properly is the man who looks correct without effort and that distinction is visible to everyone who knows what they’re looking at.

Further reading in the Shirt Care series: Easy-Iron vs Non-Iron Shirts: The Difference Nobody Tells You About and if the iron is unavailable: No Iron? No Stress: Get a Wrinkle-Free Shirt Instantly

Further Reading

Ali Taimour

Ali Taimour

Founder and Editor of Trendy Enthusiast. Ali covers men's fashion, lifestyle, grooming, and the art of dining well - blending real experience with practical insight.

Connect on Instagram
Shopping Basket